


1994-1995 Ford Mustang
| Turbo System Installation Instructions | |
| Step 1:
Remove negative battery cable. |
|
| Step 2:
Jack up front of car and securely place jack stands under lower control arms. |
|
| Step 3:
Remove intake ducting to throttle body and all other ducting from right side wheel well. Remove the stock mass air sensor from the air box and install the factory module on the mass air sensor provided. |
|
| Step 4:
Remove air injection line from air pump to cats. Save these for reinstallation. |
|
| Step 5:
Remove factory “H” pipe by first removing all attachments. |
|
| Step 6: Remove EGR pipe from right side header. Remove header and spark plugs from the same side. Save EGR pipe. |
|
| Step 7:
To make room for the turbo you must move the wiring forward. Reinstall the Ford module far forward (see photo) and route the mass air wiring harness to the outer side of the wheel well. Remove plastic inner fender well from right front. 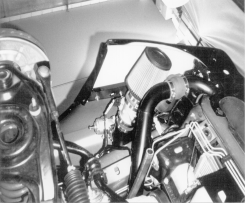 |
|
| Step 8:
Mark oil pan between the 3rd and 4th bolt from the front of the pan and 1-1/4″ down from the rail on the passenger side. Unbolt sway bar from frame rails. Using a series of center punches, 1/8″ to 5/8″, punch a hole large enough to start a 3/8″ pipe thread tap. Before tapping the hole, put alot of grease on the tap. Once you are done, clean hole thoroughly. Use silicone on 3/8″ pipe x 5/8″ hose barb and install. Put an additional bead around fitting for a leak proof seal. Install oil drain hose on fitting and remount sway bar. |
|
| Step 9: Install turbo header using 3/8″ head x 1-1/4″ header bolts and gasket. Tighten bolts so the safety wire holes are as close to straight up and down as possible. This may require moving bolts from one hole to another. Insert safety wire and twist until tight. Re-gap spark plugs to .035 and install. Remove left side plugs and do the same. 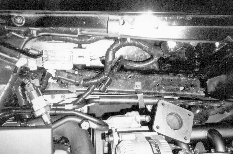 |
|
| Step 10:
Install oildrain plate on bottom of turbo with gasket. Install turbo onto header using 3/8″ x 1-1/2″ bolts with lock nuts and stainless mounting gasket. Be sure to center turbo on mounting flange. The turbo is shipped with all fasteners loose. You must rotate so the compressor housing is pointing between frame and alternator. The oil drain fitting should be straight down. Tighten all bolts to 25lbs. Install oil drain hose onto turbo.  |
|
| Step 11: Install exhaust discharge pipe with 3/8″ x 1″ bolts and EGR tube from valve to downpipe, but, don’t tighten yet. 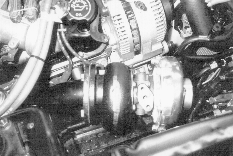 |
|
| Step 12:
Install wastegate onto header using the gaskets and 5/16″ x 1″ bolts and locknuts. Don’t tighten yet. Slip one end of the 1-1/2″ wastegate dump pipe into the exhaust discharge pipe and rotate until it matches up with the wastegate, mount with same bolts and gasket. Now, evenly tighten all bolts and EGR tube. 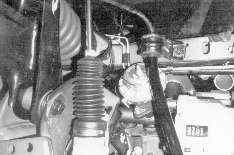 |
|
| Step 13:
Remove three fasteners that hold the lower bumper cover in place. Pull down cover to install intercooler. Remove and discard lower hood latch support bracket. If your car has a power steering cooler it must be relocated. Place intercooler as shown in photo. Bolt bottom mounts of intercooler to the holes where the P.S. cooler was. Drill and rivet upper mounts. Remount P.S. cooler using bracket provided.  |
|
| Step 14:
Remove right front tire and inner fender well. Install the compressor ducting. First, install the pipe from turbo, it starts out as 2″ and goes towards the core support. The 2nd piece is L shaped and goes down to the intercooler. Use a 2-1/4″ hose to join them and a 2-1/2″ to attach to intercooler. Once mounted and checked for clearance, tighten all clamps. 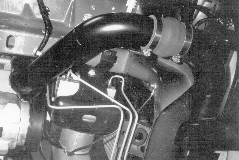 |
|
| Step 15:
Install intercooler outlet pipe. It goes from intercooler and is routed under right front bumper bracket then points into wheel well area. The next pipe is 3″ at the throttle body and mounts to the previous pipe. It needs to be routed through the hole for the original air cleaner. Next install the by-pass valve on flange with 6mm allen bolts, nuts and gasket. Install the 3″ air inlet pipe through the same hole as the intercooler ducting. Mount to turbo using a 3″ hose and clamps. Hook up short 1-1/2″ discharge hose from by-pass valve. Position ducting so it doesn’t rub. 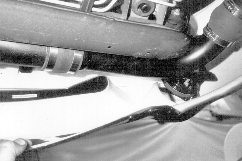 |
|
| Step 16: Install MAF sensor and air filter onto the end of the 3″ air inlet pipe. The bracket on the MAF will bolt to the bottom of the frame rail. Plug in the MAF. Hook up the by-pass valve to the fuel pressure regulator vacuum source with tee and 5/32″ hose provided. Reinstall wheel well. 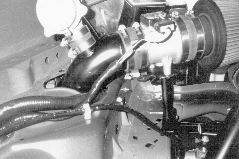 |
|
| Step 17:
Remove stock oil pressure sending unit from lower left side of motor. Install 1/4″ pipe x #4 hose fitting where sending unit was. Bolt the 1/4″ pipe female tee to the belt tensioner bracket. (see photo) Install the O.E. sending unit in the 12:00 position and #4 AN fittings in the other two holes. Locate two #4 feed lines. The short one goes from the tee to the engine and the long one goes from the tee to the turbo. Use thread tape on ends and plug in sending unit. 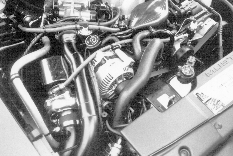 |
|
| Step 18:
Reinstall the air injection tube from the bottom up. Locate stock air injection hose. The two hoses that point to the rear must be shortened 1-1/2″. Install hoses, lower hose connects to the one way check valve and the other connects to the converter pipe. Install 12″ silicone hose from air pump to air valve. Install 30″ hose from air valve to secondary valve and secure with 3/4″ hose holder. Install 3/16″ hose union into stock air pump vacuum hose along with 12″ vacuum hose and connect to air pump valve.  |
|
| Step 19: Install chrome heat shield onto turbo using 3/8″ x 1-1/4″ bolt. Install air intake temperature sensor into 3″ inlet pipe and plug it in. Install 1/4″ pipe x 3/8″ hose fitting into 3″ inlet pipe. Locate 12″ long 3/8″ hose with union on it. This hooks up with O.E. hose from oil filler neck to 3′ inlet pipe.
|
|
| Step 20:
Install 2-1/4″ crossover pipe. You must cut one of the original flanges off of the “H” pipe to use on the crossover pipe. Be sure to center the collector onto the header and tighten evenly. The other side bolts to the turbo header using the three 1-1/4″ bolts and lock nuts provided. Install one oxygen sensor in crossover and the other in the exhaust discharge pipe. Final exhaust hook up is up to you. Pictured below is the best way to finish the exhaust. This keeps the converters functional and is fairly simple.  |
|
| Step 21: Install the fuel pressure regulator. It needs to be mounted on the rear of the right side strut tower. Locate the fuel return line at the fuel rail. Cut the nylon line off with a razor blade and slide on 5/16″ high pressure hose and clamp on to hose barb fitting. Now, run the hose to the off center fitting on the regulator. Cut the other end of the nylon line from the steel line that returns to the fuel tank. Run a hose from this steel line to the on center fitting on the regulator. Locate the nylon vacuum line that runs along the firewall, it has a splice in it. Separate the splice and insert the 1/4″ tee supplied and vacuum hose. Connect the other end to the regulator. 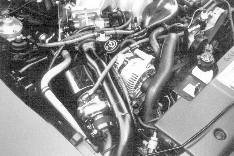 |